Dome slaving is the process of getting your observatory’s dome to rotate automatically so it’s always positioned so your telescope looks out of the dome shutter. This is a short series of tutorials to show you how it’s done (or at least how we’ve done it) in different situations.
Dome slaving – a recap
In the previous part of this series I talked about slaving your dome by allowing your observatory control program (Voyager, NINA, SGP, etc.) to have all the control. It knows the geometry of your dome and the mount inside it, does the calculations to determine what azimuth your dome has to be for any place in the sky your scope is pointed to, and communicates directly with the dome and mount to organise the right outcome. Simple, right?
Just as a reminder, automated observatories need three components to enable you to keep the dome shutter in front of the telescope:
- a dome that moves accurately to the commanded azimuth (0° to 360°)
- a mount (with a telescope) that also moves where commanded
- a computer to do the calculating and communicating
The simplest setup, which is what I described last time, is to have the observatory control program as source of all truth. It can command the mount to slew to the target co-ordinates, then do the calculations for the destination dome azimuth. If your dome and mount have nicely behaved drivers, it can then command the dome to rotate to that azimuth. Job done.
Yeah, naah.
If you’ve been into automated astronomy or astrophotography for longer than a few months, you’ll realise there’s nearly always a great reason why you can’t do what you want to. There are very often hurdles in the way and you often have to get creative and approach the problem in a different way.
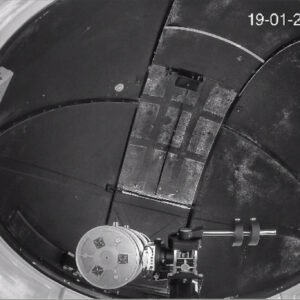
Our example is at a school. They have a remote Sirius dome that’s run through a set of MaxDome II control cards. We had trouble with the MaxDome 64-bit ASCOM driver (our dome control software, Voyager, wouldn’t connect to the MaxDome 32-bit driver, and for other reasons we couldn’t use the 32-bit version of Voyager) so we needed to find another way to slave the dome.
We can communicate through an intermediary
Initially we tried using the 32-bit version of Voyager, but that gave us other problems. Eventually, we found that the ASCOM Device Hub was able to connect to the 64-bit Voyager and to the mount driver, acting as a go-between.
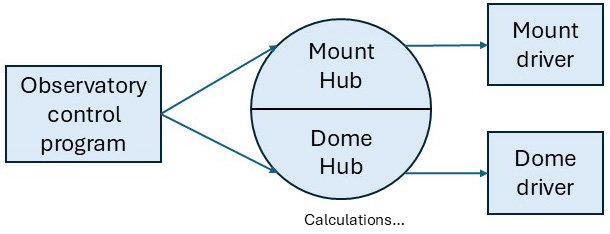
The ASCOM Device Hub is essentially a post office that routes communications between different devices. The hub itself runs on the dome computer and can connect to a dome, a mount, and even a focuser if you want. So, for example, if connect your computer, your dome and your mount to the Hub, your computer can command the dome to go to an azimuth, and the Hub will pass that command on. The computer doesn’t have to know anything about the dome or even have a driver for it – it just has to know that the Device Hub is taking care of it. Once the dome gets to the right place, it will let the Hub know it’s there, and the Hub will report back to the computer. Think of it as middle management.
But we still had to think about how to drive the mount. For the communication between Voyager and the mount (an iOptron CEM120), we already had a reliable method, iOptron Commander. We could have set the system up like this: the computer is using just the dome half of the Hub, and controlling the mount directly.
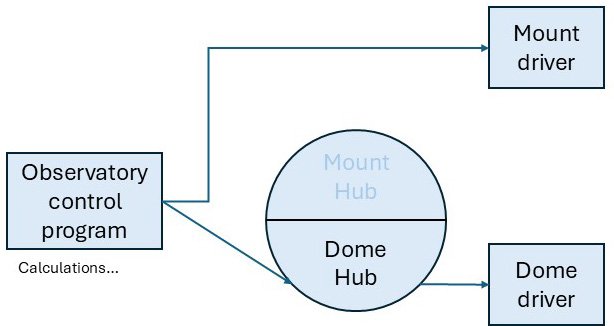
If we did this, going directly to the mount, but through the Device Hub to the dome, we could perform the slaving calculations in Voyager. However, we couldn’t do the calculations in the Dome Hub because the Dome hub knows nothing about the mount, what it’s doing or where it’s pointing.
We actually started out setting the observatory up like this, but we found that at some parts of the sky the dome was still eclipsing the telescope with Voyager’s calculations. This resulted in some unwanted diffraction spikes on our stars.
There happened to be a new version of ASCOM (7.1) out with an updated dome geometry calculator. So, we decided to try slaving entirely in the ASCOM Device Hub, doing the calculations there, and hoping that this would give more accurate results. To do this, Voyager would connect to both the mount part and the dome part of the Hub rather than connecting directly to the iOptron driver or the problematic MaxDome driver. The Hub would then connect to the dome and the mount itself, which it had no trouble with. Because of this, the calculations could be done by the Hub, but we had to remember to explicitly tell Voyager not do the calculations as well.
Mount setup
In this case, the communication is done in two hops. The observatory control program (Voyager) connects to the Mount Hub, and then Mount Hub connects to the mount, using the ASCOM iOptron driver.
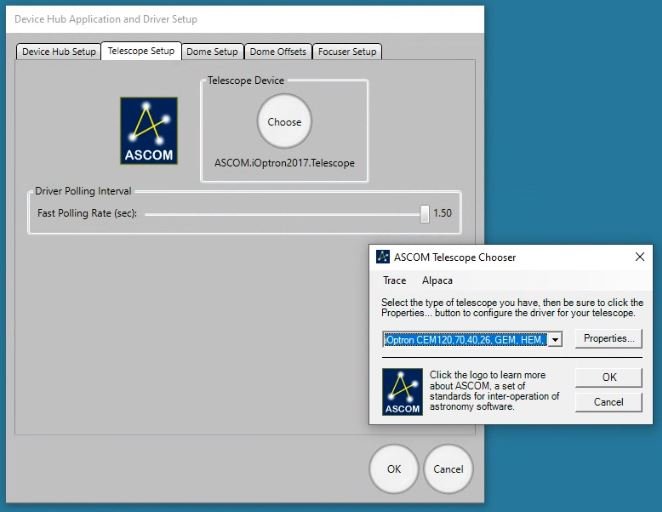
First, you need to set up the connection between the Hub and the mount. In the Device Hub the setup is as below. From the ASCOM chooser, select the relevant iOptron driver.
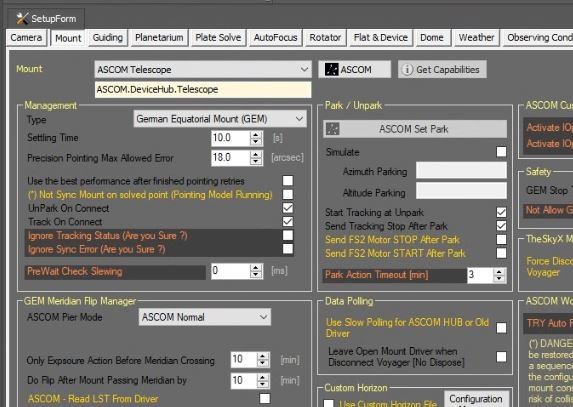
Second, you need to set up the link between the observatory control software and the dome Hub. The Voyager Mount setup page looks like this screenshot. The mount is an ASCOM telescope, and from the ASCOM dropdown we selected ASCOM.DeviceHub.Telescope.
Dome setup (in Voyager)
As it was for the mount, the connection to the dome consists of two legs. First, the connection between the Dome Hub and the dome. Second, the connection between the observatory control software and the Dome Hub.
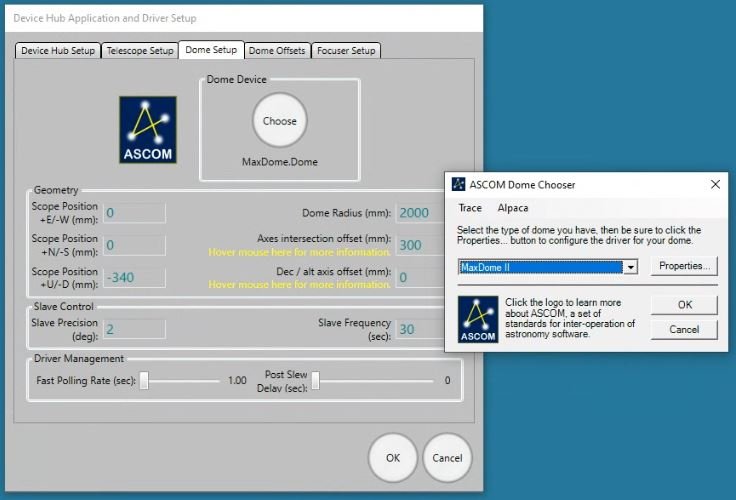
The ASCOM Device Hub showing setup for the dome looks like the screenshot below. From the chooser, select the Dome Driver (in this case, a MaxDome II ASCOM driver). If you click on the properties button in the ASCOM Dome Chooser, you can set home, park, COM port, etc. (I haven’t included this.)
Next, the connection between the observatory control program and the Dome Hub is shown here. Select an ASCOM dome and then click the ASCOM button to choose Device Hub Dome in the ASCOM. If you click on Properties, you will see a screen very similar to the dome setup screen above, including the same information.
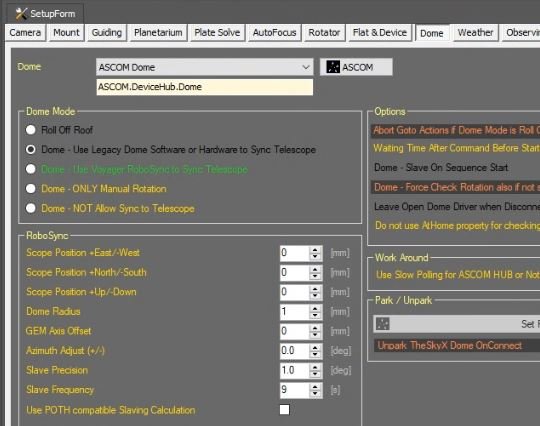
Calculations
Because the slaving calculations are done in the Device Hub rather than in Voyager’s RoboSync, we select “Use Legacy Dome Software” in the Voyager Setup Page and enter the dome geometry (that’s the up-down, north-south and east-west offsets, dome radius and GEM offset) into the Device Hub. The equivalent fields in the RoboSync box in Voyager’s dome setup screen are irrelevant because we have told Voyager not to use RoboSync (Voyager’s dome calculation algorithm).
When slaving the dome in Voyager, you will see that the status indicator says, “Dome Slaved” rather than “Dome Slaved using RoboSync”.
Summing up…
This scenario is very much a second-best situation, meaning you’d only do it if you didn’t have a good reason. That reason would normally be due to something you don’t have any control over (such as not having a driver that worked directly), and this is what’s going on here. However, the ASCOM Device Hub is a pretty reliable communication method, and if you are having trouble getting your dome to slave accurately, the new geometry calculation is probably worth a try.
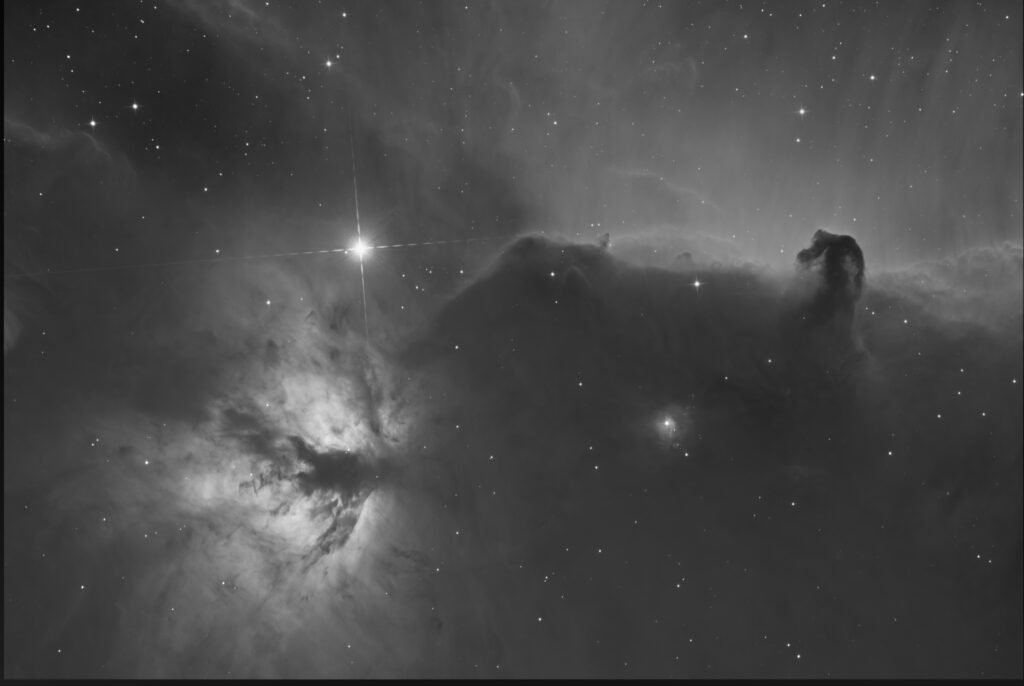
Having used it with the Sirius dome for a couple of months now, I can report no issues. The test image at the top of this page was quite good, with only the two pairs of expected diffraction spikes on Alnitak. If the scope was even slightly eclipsing the telescope there would be an additional pair of spikes.
In the next installment we’ll talk about a different situation again. What happens when you have a user who wants to do some astrophotography, but who also wants to (shock horror) put her eye to the eyepiece occasionally and (even more horror) run the mount with a hand controller? How do you get the observatory control program to be the master when it’s not even running?