People always ask me about sampling rates. Really? Well, most people don’t know they’re asking about sampling rates, but their questions are more like “what’s the best pixel size for my telescope”, or “how good do I need to be with my guiding”, or “when should I be binning my pixels”, or “how round do I need my stars to be”, or “why are my stars badly pixelating as soon as I zoom in”? All these questions, and probably more, have at least something to do with sampling rates.
There are a host of factors that determine how good your stars look. They include:
- your camera’s pixel size
- your camera’s ADC
- your telescope’s focal length
- your mount’s guiding performance
- the seeing conditions on the night
What is sampling?
When your camera sensor is being exposed to the stars, a super-thin beam of light from any star is being focused on a single pixel. As long as your guiding is good, the same single pixel will be hit by that same star’s light for the entire exposure. That’s the theory, of course. Lots of factors will conspire to cause that beam to wander around, and not only hit that one pixel, but spray over its neighbours as well.
Sampling refers to the number of pixels that are hit by the light from that one star. You’ve seen the effect when you blow up an image to the point when individual pixels are visible. The star will get to a certain size and begin to pixelate. That break-up point isn’t to do with what your computer or phone display is capable of. Rather, it represents the number of photons that originally hit the pixels on the sensor.
Oversampling or undersampling?
Oversampling is when you have more pixels on the star than is necessary. The shot looks seriously great, and you can zoom in a long way for “pixel peeping”. But – and be honest – you could have got just as good a shot with fewer pixels.
Undersampling is when you haven’t used enough pixels on the star. Its light has spread itself over a small (something like a 5×5) area on your sensor. When you zoom in (even a mild amount) the stars look pixelated and blocky.
“Just right” sampling is in the eye of the beholder, of course. Generally if you can zoom in a chunk and not see any significant degradation of the image it’s right.
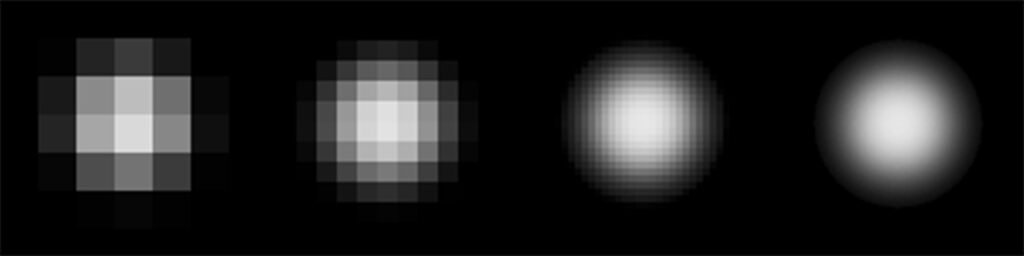
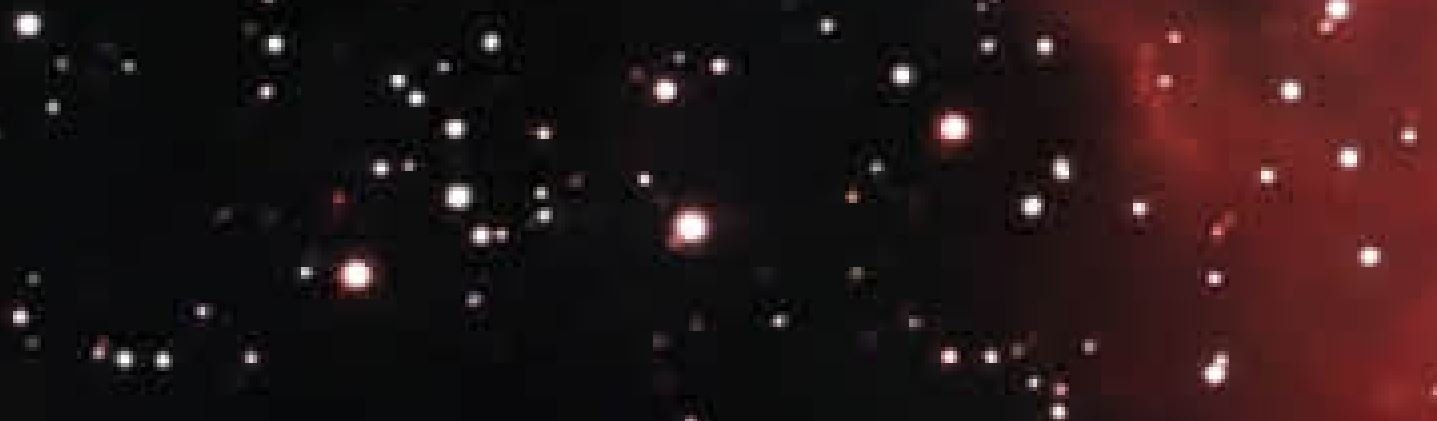
The image at the top of this article is of are some (simulated) stars showing what I mean. Again, what an optimal fully zoomed in star looks like is up to you, but I’m calling these (from left to right), undersampled, about right, oversampled, and “stupidly oversampled”.
How many pixels do you use – pixel scale
So how many pixels do I have on that star, and what’s the best? In theory, of course, the answer is “one”, because the stars are point sources, so that light beam is infinitesimally thin. But stars come in different brightnesses, and the brighter they are, the more they’ll naturally spill over onto neighbouring pixels.
So rather than thinking of how many pixels are on that star, think of the opposite, how much sky does a single pixel see. Pixels are like tiny telescopes, all looking through your telescope at the sky. How much each star is simply your camera’s field of view divided by the number of pixels on the camera. It’s measured in arcseconds per pixel (“/px), and depends on your physical pixel size and the focal length of your telescope.
Putting some numbers on it
It turns out that the number is the pixel size in microns (µm) divided by the focal length of your telescope multiplied by 206.3. So, for example, if you’ve got my elderly ZWO ASI1600MM-P (with its 3.8µm pixels) hooked up to a 12″ f/4 Newtonian (with its 1200mm focal length) your pixel scale is 0.65 arcseconds per pixel. At the other end of the scale, suppose you put an ASI432MM (with its chunky 9µm pixels) behind a 50mm camera lens (I’ve done this) each pixel sees a whopping great 37 arcseconds of the sky, mainly due to the very low magnification of the lens.
Imagine holding up a bit of flywire and looking through it – the coarseness of those little windows will give you an idea of how many pixels a target of given size will illuminate. And just to remind ourselves, having stars that look all pixelated and blocky (undersampling) is one end of the continuum, stars being too smooth and perfect (oversampling) is the other end.
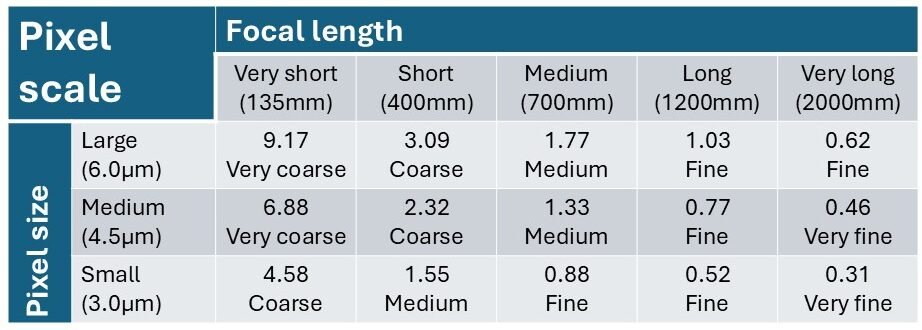
I did a bunch of calculations to get an idea of what various focal lengths and pixel sizes combine to make. I’ve arbitrarily classified pixel scales into five groups:
- below 0.5″/px – very fine
- between 0.5 and 1.0″/px – fine
- between 1.0 and 1.8″/px – medium
- between 1.8 and 3.0″/px – coarse
- above 3.0″/px – very coarse.
So, if you have a pixel scale of 1.4″/px like my camera and refractor, you can call that “medium”. Take the camera off the refractor and put it on a Schmidt-Cassegrain with more magnification and you can say your pixel scale is now “fine” and you’re oversampling. Alternatively, change the camera for that ASI432 with its big fat pixels and we’re getting into undersampling territory, where the stars start to go blocky.
Or that’s the theory. There are always complications…
Seeing conditions and guiding errors – more complication
You do, of course, realise that the atmosphere above us isn’t perfectly transparent. Warm and cool pockets effectively make lenses that mean that light doesn’t travel in a straight line, but rather it wobbles and wanders around randomly. On a normal night, stars can dance around and wander by 3 arcseconds. On bad nights, when it’s warm and windy, that can get up to 6 arcseconds. When this happens, that star’s beam of light wanders all over your sensor and strikes more and more pixels.
And things get even more complicated with autoguiding. Astrophotographers are always boasting about how good they can make their rigs guide. Unless you have something really special, that’s set up, balanced and aligned absolutely perfectly, you will have at least some average 2-dimensional (RMS) error. Typically, astrophotographers are happy with sub-arcsecond guiding, and very happy with half that. But on a bad night, your guiding error might be up to 2″.
Combining a 6 arcsecond wobble from poor seeing with a 2 arcsecond guiding error is more than the numbers we’ve been dealing with so far. Are we completely wasting our time? Well, the answer is “only partly”.
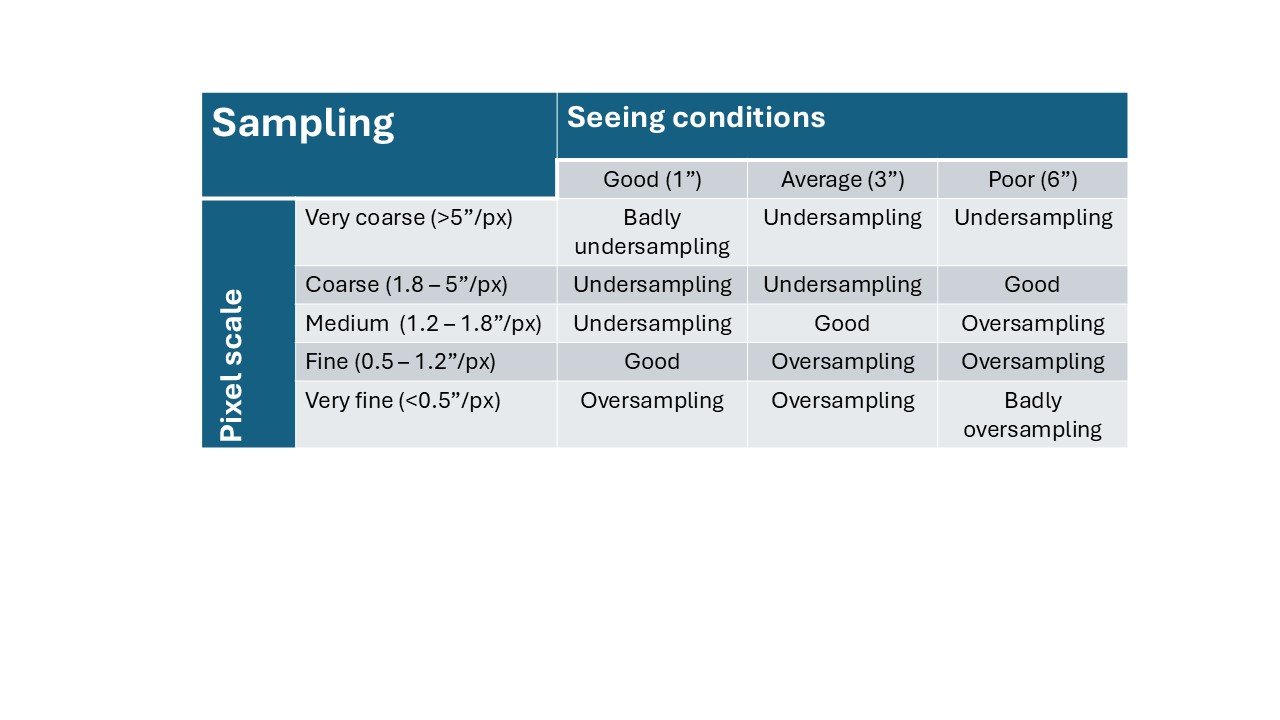
A bit of detail about seeing conditions and sampling
Again, here’s a table I made up as a rough guide. Your mileage may vary. It shows how seeing conditions affect rigs with different pixel scales.
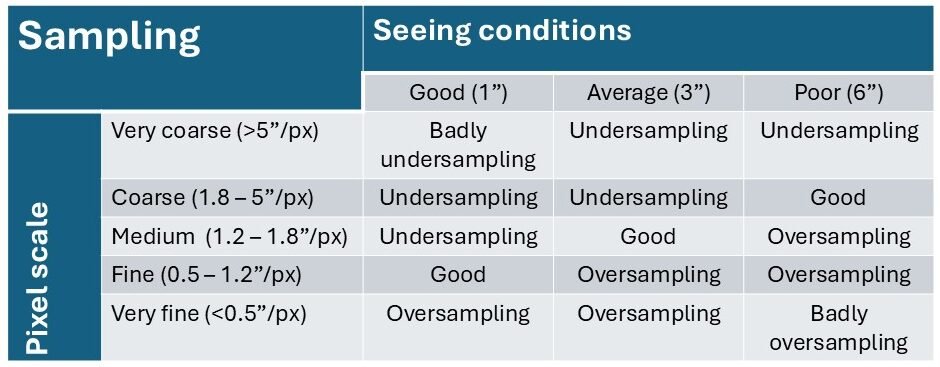
Let’s say you have a combination of scope and camera that gives you a nicely sampled star. It’s neither blocky nor so fine that you’ve wasted your money. But what happens on that night of great seeing conditions? Well, the light from that star wanders around a lot less than on an average night, meaning it hits fewer pixels. So, ironically, when you zoom in and pixel peep, that star is going to look smaller and blocky. You’re undersampling! (By the same logic, a poor night is going to make your stars look bloated, but when you look at them closely, they’ll be oversampled. I’m not convinced that’s such a good thing.)
Let’s now say you have a rig that oversamples slightly in average conditions. Sure, the stars look great, but you could have got the same effect using fewer pixels. But on that beautiful night, when the stars spread themselves over fewer pixels, you’re ready for it! The stars are smaller, and they look great because you’re sampling appropriately.
This is the reason why I advise people to oversample slightly.
At the other end of the atmospheric scale, on a poor night you might consider binning your pixels. This is the process of combining matrices of pixels, 2×2 or even 3×3, to simulate larger pixels. If you have a camera with very small pixels this can improve the look of your stars. However, a more common rule is that if you find the conditions are very poor, you should probably catch up on sleep.
But what about guiding?
To be honest, most people don’t have much flexibility with guiding performance. You just do the best you can under every circumstance. And remember also that guiding performance often coincides with poor seeing conditions. If your guide star is wobbling all over the shop, it’s going to confuse your guiding. If you don’t have a sufficiently long PHD exposure you might end up chasing it around, which won’t do anyone any good.
But better guiding tends to mean you’re edging towards undersampling, because the starlight is hitting fewer pixels. This means that – especially if you have a large sized pixel – perhaps putting lots of effort into tweaking your autoguider settings isn’t time really well spent!
The rule of thumb for guiding is that you don’t need a smaller guiding error than your pixel scale. For most rigs, that’s not difficult to achieve.
Conclusion
Unless you’ve just purchased a complete system, such as a ZWO scope, mount, camera, etc., most people have such a range of equipment that I can’t give you specific guidance here. We’re dealing with camera lenses with focal lengths of 15mm up to RCs with focal lengths of over 2000mm. We’ve also got sensors that range between 2µm and 9µm.
My advice is to use a guide such as at www.astronomy.tools and it’ll tell you whether you’re over-or undersampling in “average” conditions.
As I’ve said, my advice is to aim for a pixel scale that will mean that in average conditions, you’re oversampling a fraction. This gives you the ability to get great shots on that unusually good night.
Epilogue
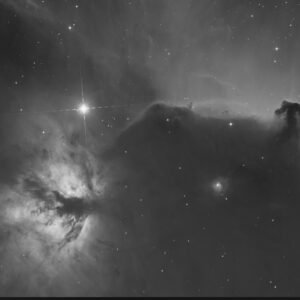
One of the most popular products around at the moment is the ZWO SeeStar S50. This has a focal length of 250mm and an IMX462 as a sensor, which as 2.9µm pixels. This gives the SeeStar S50 a pixel scale of 2.39″/px, which I’ve classified in my table as “coarse”. This means the SeeStar S50 tends to undersample, meaning you can’t zoom in far before the stars start to pixelate. Here’s what I mean.
If you’re looking for good news here, consider a night with poor seeing. The SeeStar will produce better sampled stars, as they’ll be bloated, but that will cover more pixels and each star will look smoother. Alternatively, on a good night, the stars will be smaller and they’ll be even blockier. The trick with the SeeStar then, is that you should be happy with the field you have and not zoom in!