How do I get a good scope?
Here are my tips to help you avoid turning off a young astronomer. I’d like these to help everyone, especially those parents who can see a genuine curiosity in their kids, even if they might not know much about telescopes themselves. With experience, you can get around many of these issues, but the idea is to avoid the headwinds.
Aperture – the bigger the better
This is the size of the opening at the front of the telescope. The larger the aperture, the more light gets in, and light is the raw material for your image. If the aperture is too small, what you see is going to be dim, and unless you’re looking at the Moon, you’re not going to see much at all. And a late hint: if the description of the telescope doesn’t say what the aperture is, you can bet it’s not enough!
For a refractor to be useful, the absolute minimum should be 70mm, and preferably 90mm. I’ve seen refractors down to 40mm – honestly, something like this is only good for spotting things during the day.
Reflectors tend to be larger, because they’re cheaper to make. I’d say for a reflector a minimum of 130mm is a good size. If you can manage a 150mm or even 200mm Dobsonian scope, you’re flying!
Magnification (focal length) – not too much
Magnification in a visual telescope is a function of the telescope’s focal length (more length, more magnification) and the eyepiece’s focal length (more length, less magnification).
But beware: magnification is not always your friend. Too much magnification and the bit of sky you’re looking at gets so small that you’ll have trouble even finding that planet.
One of the limiting factors for magnification is Earth’s atmosphere. Air isn’t really all that transparent. Worse, air has warm and cool patches that cause lensing effects, and these swirl around constantly, mucking up your view. Higher magnification only exacerbates this, and on warm nights it can be impossible to get a decent view of anything.
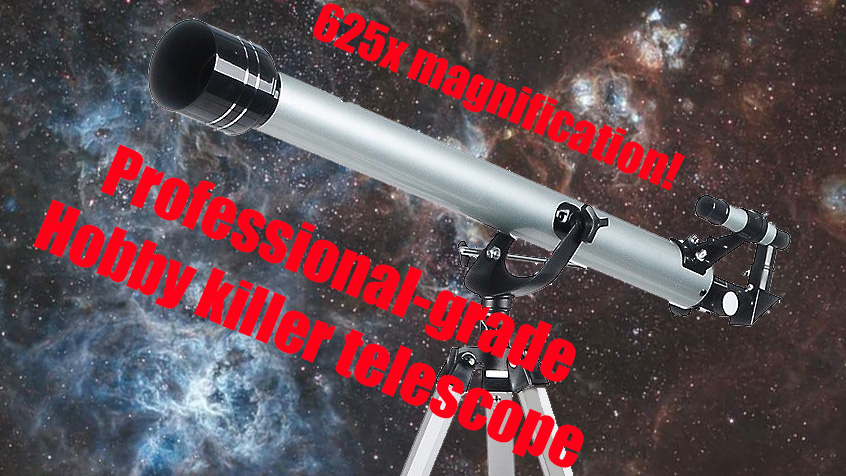
Hobby killer telescopes often have huge magnification claims on their boxes, such as 200x or more, and in some cases much higher. Don’t fall for this – 65x (which is what you get with 650mm focal length and a 10mm eyepiece) is enough to see a small image of the rings of Saturn. Saturn is incredibly small, and more magnification than this will only show you a swirly blob.
Design – can you manage a Dobsonian?
Refractor or reflector? If other aspects of the scope are right, both are good. Refractors are robust, and don’t require adjustment, but reflectors give you more aperture for your buck.
The Dobsonian reflector offers you the best image for the money – they’re fantastic starter telescopes, and astronomical societies often use them out as loan scopes. There’s a disadvantage though – they can be large and heavy. The smaller type that sits on a table, on the other hand, can be brilliant.
Late hint: if you’re considering a reflector, and the tube length is less than the focal length, you’ll be looking at a Bird-Jones design. These are great until you need to adjust the collimation – and then they’re a nightmare. Best left alone.
Mount – forget the equatorial for now
Another choice you have is the mount. There are two main types – alt-azimuth, which means it moves left-right and up-down, and equatorial – meaning it moves in circles to follow the stars (this is the one with the counterweights).
The clear winner here for a first scope is the alt-azimuth type. It’s easy to understand and doesn’t take ages to set up and adjust like the equatorial type. You won’t need an equatorial mount until you get into astrophotography.
But the mount needs to be solid. If your telescope wobbles around when you try to keep up with that planet, it’s not worth it. Having “slow motion controls” is a big plus – you can gently adjust the mount to track your target without having to shove it with your hands.
Computer – can be a good idea but it takes practice
Some telescope mounts have computers (either in a hand controller or in a phone app). These are absolutely brilliant – they’ll find those hidden targets and track them so you can just gaze.
But it can be a two-edged sword. Not only do they need power, they can be fiddly to set up. The alignment process means you need to set the time, date and location, and then accurately point the scope at a few named stars before it can take over. With practice, this can take only a few minutes, but the first time – I can guarantee – it’ll take ages. And while you’re fiddling with the alignment, the young astronomers have got bored and have gone inside to watch TV.
Expectations – are you expecting too much?
A pet hate of mine is telescopes that come with copyright-free Hubble photos of galaxies and nebulas on the box. I can’t think of a better way to set a new astronomer up for disappointment. The human eye just isn’t capable of seeing this type of thing, even with a million dollar telescope.
When anyone new starts to use a telescope, they’ll have some sort of expectation about what they’re going to see. Often, these expectations are a bit ambitious.
The Moon is big and bright, and it’s well suited to a small telescope, even one with the magnification cranked up. You’ll be able to explore craters and seas – it’s a strangely peaceful experience. You can also see the rings of Saturn or the moons of Jupiter, but realistically, planets are tiny objects, and unless the conditions are perfect, you won’t see much larger than a pea held at arm’s length.