Having a telescope is awesome. You can look at all manner of things astronomical and wonder.
For many people, though, just seeing the Moon isn’t enough. To quote my millennial daughter, “if there aren’t photos, it didn’t happen”.
So how do you get a photo through a telescope (without breaking the budget)?
Everybody has a camera in their pocket these days, bundled in your phone. If you hold your phone’s camera behind the eyepiece, you can actually take a photo through the telescope. This is fantastic for large bright objects, particularly the Moon.
But the hardest challenge for people doing this is to hold the camera perfectly steadily, and in exactly the right spot. Wobble around just the tiniest bit and your beautiful lunar image disappears off the screen, never to be found again.
If only something can be used to hold your phone in just the right position!
The saxon ScopePix
Of course, there are a number of products that attach your phone to the telescope’s eyepiece.
There are other, more sophisticated clamps around, such as the
Long Perng Universal adapter. But we like the ScopePix because it’s simple and light, isn’t too fiddly and won’t droop and ruin your image.
What’s not immediately obvious though, is how to attach your phone to the telescope. Here’s a guide for new users.
Attach the phone to the ScopePix
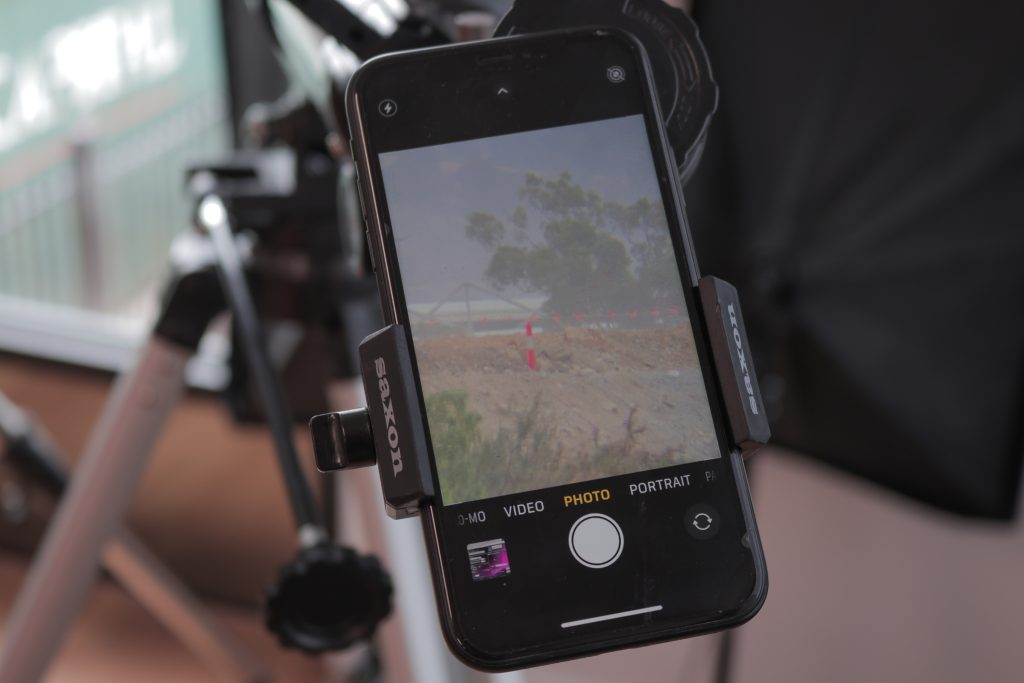
First, you need to attach your phone to the ScopePix. I’d recommend removing your phone from its cover. some covers are fine, but the square jaws that hold your phone can slip on others.
To open the jaws, wind the knob on the side of the square clamp. It’s a fine thread, so you’ll need to turn the knob a lot of times. You only need it wide enough so the jaws can fit your phone.
Put your phone into the clamp so the main camera lens is pointing away from you, and you can see the “saxon” brand on the clamp jaws. (Of course, I’ve put my phone backwards into a ScopePix an embarrassing number of times…)
Close the clamp gently, remember it’s made from plastic. A tip is to make sure the clamp isn’t pressing any buttons on the side of the phone.
Now turn the phone and ScopePix over so you’re looking at the back of the phone.
Position the eyepiece clamp in front of your camera lens
Notice that the round clamp on the ScopePix. This is used to hold a standard 1.25″ eyepiece. When you loosen the bolt that holds its arm, the clamp can move left, right, up and down.
Now you can arrange the round clamp so the main camera lens looks (as accurately as you can) through the hole in the middle of the round clamp. Tighten the bolt that holds the round clamp in place.
If your phone has more than one lens (mine doesn’t), you will have to choose which one you need later. Phones swap cameras for different zooms and different light conditions. This can mean that you’ll unexpectedly see black while zooming in on the Moon. You’ll have to learn which lens you need with a bit of trial and error.
Insert the eyepiece
Now, take a low-power eyepiece (such as a 25mm), curl the rubber eyecup back and place it in the round clamp so the eyepiece is facing the camera lens. You might have to open the jaws of the clamp a little to allow the eyepiece to sit inside. Tighten the clamp gently enough to hold the eyepiece firmly, but remember the jaws are plastic so don’t tighten it too much. It’s also important that the eyepiece is not on an angle, or your picture will end up distorted.
The 25mm eyepiece is probably the best one to start with, as it’s a fairly wide angle. A higher power lens, like a 10mm one, might be better for taking a photo of Jupiter or Saturn, but it’s a lot fiddlier to adjust so I’d leave that for when you’ve got more practice and experience.
Insert the assembly into the telescope
Next, put the whole assembly into the telescope diagonal. Tighten it in the same way that you tighten in an eyepiece.
See what your telescope sees
Open your camera app and you should see on the camera what the telescope is looking at. You might have to zoom a little to fill the phone field, but if you do, remember that your phone might change lenses.
You’ll also find that small movements of the phone or the eyepiece relative to the body of the ScopePix makes a big difference to the image, so it might take a bit of trial and error to get the best image.
Start off with the Moon. You’ll find the best result is with the 25mm eyepiece, but for a planet you might like to try the 10mm for a bit more magnification. It’s a lot harder to adjust though.
One more tip,
the saxon ScopePix comes with a little Bluetooth remote button that will fire your camera without your having to touch the phone. This makes a huge difference because the telescope isn’t moving when the exposure goes off.
Go ahead, try it, you’ll find it’s endless fun with lunar pictures!